FT2232SPI Programmer: Difference between revisions
(→Setup: Add schematics for the DLP-USB1232H based SPI programmer.) |
(→Setup: Explain schematics and how to build the breadboard circuit.) |
||
| Line 15: | Line 15: | ||
In order to use the DLP-USB1232H device as SPI programmer you have to setup a small circuit (e.g. on a breadboard). See the schematics for details (you can also [http://www.coreboot.org/images/2/26/Dlp_usb1232h_spi_programmer.pdf download the schematics as PDF] for easier printing). | In order to use the DLP-USB1232H device as SPI programmer you have to setup a small circuit (e.g. on a breadboard). See the schematics for details (you can also [http://www.coreboot.org/images/2/26/Dlp_usb1232h_spi_programmer.pdf download the schematics as PDF] for easier printing). | ||
* You must connect '''pins 8 and 9''', which configures the device to be powered by USB. Without this connection it will not be powered, and thus not be detected by your OS (e.g. it will not appear in the '''lsusb''' output). | * You must connect/shorten '''pins 8 and 9''', which configures the device to be powered by USB. Without this connection it will not be powered, and thus not be detected by your OS (e.g. it will not appear in the '''lsusb''' output). | ||
* You need a 3.3V voltage regulator | * You need a 3.3V voltage regulator to convert the 5V from USB to 3.3V, so you can power the 3.3V SPI BIOS chip. | ||
** | ** You can probably use pretty much any 3.3V voltage regulator, e.g. '''LD33V''' or '''LD1117xx'''. For usage on a breadboard the TO-220 packaging is probably most useful. | ||
** You have to connect two capacitors (e.g. 100nF and 10uF as per datasheets, but using two 10uF capacitors, or even two 47uF capacitors also works in practice) as shown in the schematics, otherwise the voltage regulator will not work correctly and reliably. | |||
* Connect the following pins from the DLP-USB1232H to the SPI BIOS chip: | * Connect the following pins from the DLP-USB1232H to the SPI BIOS chip: | ||
** '''18 (SK)''' to '''SCLK''' | ** '''18 (SK)''' to '''SCLK''' | ||
| Line 23: | Line 24: | ||
** '''2 (DI)''' to '''SO''' | ** '''2 (DI)''' to '''SO''' | ||
** '''5 (CS)''' to '''CS#''' | ** '''5 (CS)''' to '''CS#''' | ||
** The '''WP# and HOLD#''' pins should be tied to '''VCC'''. | ** The '''WP# and HOLD#''' pins should be tied to '''VCC'''! If you leave them unconnected you'll likely experience strange issues. | ||
** All '''GND''' pins should be connected together ('''pins 1 and 10''' on the DLP-USB1232H, '''pin 8''' on the SPI chip, '''pin 1''' on the voltage regulator) | ** All '''GND''' pins should be connected together ('''pins 1 and 10''' on the DLP-USB1232H, '''pin 8''' on the SPI chip, '''pin 1''' on the voltage regulator). | ||
You have to invoke flashrom with the following parameters: | You have to invoke flashrom with the following parameters: | ||
Revision as of 19:46, 5 September 2009
Recent versions of flashrom support the -p ft2232spi option which allows you to use a FTDI FT2232H/FT4232H based device as external SPI programmer.
This is made possible by using libftdi. flashrom autodetects the presence of libftdi headers and enables FT2232H/FT4232H support if they are available.
DLP Design DLP-USB1232H
The DLP Design DLP-USB1232H (datasheet) can be used with flashrom for programming SPI chips.
Where to buy: Digikey, Mouser, Saelig
Setup

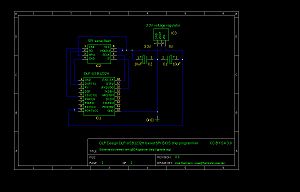
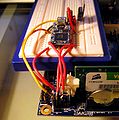
In order to use the DLP-USB1232H device as SPI programmer you have to setup a small circuit (e.g. on a breadboard). See the schematics for details (you can also download the schematics as PDF for easier printing).
- You must connect/shorten pins 8 and 9, which configures the device to be powered by USB. Without this connection it will not be powered, and thus not be detected by your OS (e.g. it will not appear in the lsusb output).
- You need a 3.3V voltage regulator to convert the 5V from USB to 3.3V, so you can power the 3.3V SPI BIOS chip.
- You can probably use pretty much any 3.3V voltage regulator, e.g. LD33V or LD1117xx. For usage on a breadboard the TO-220 packaging is probably most useful.
- You have to connect two capacitors (e.g. 100nF and 10uF as per datasheets, but using two 10uF capacitors, or even two 47uF capacitors also works in practice) as shown in the schematics, otherwise the voltage regulator will not work correctly and reliably.
- Connect the following pins from the DLP-USB1232H to the SPI BIOS chip:
- 18 (SK) to SCLK
- 16 (DO) to SI
- 2 (DI) to SO
- 5 (CS) to CS#
- The WP# and HOLD# pins should be tied to VCC! If you leave them unconnected you'll likely experience strange issues.
- All GND pins should be connected together (pins 1 and 10 on the DLP-USB1232H, pin 8 on the SPI chip, pin 1 on the voltage regulator).
You have to invoke flashrom with the following parameters:
$ flashrom -p ft2232spi:ft2232_type=2232:port=A
Photos
FTDI FT2232H Mini-Module
The FTDI FT2232H Mini-Module Evaluation Kit (datasheet) can be used with flashrom for programming SPI chips.
Where to buy: FTDI
FTDI FT4232H Mini-Module
The FTDI FT4232H Mini-Module Evaluation Kit (datasheet) can be used with flashrom for programming SPI chips.
Where to buy: FTDI


